Continuing with the previous project of the keyboard controlled robot car and adding indicator lights to it... This is a really simple addition to the robot car, just a few LEDs to act as the car's indicator lights. And modifying the program to blink the LEDs on left/right turns and on reverse.
Additional materials for the indicator lights:
For each LED, follow the same wiring process that we used for the LEDs in the previous projects. Connect the positive leg (longer leg) of the LED to one of the Digital outputs (Digital 10, 11, 12 or 13), via a resistor. And connect the negative leg (shorter leg) of the LED to the Ground (GND) via a jumper cable. Repeat the process for all 4 LEDs.

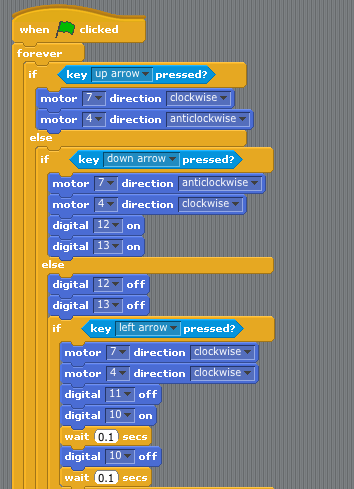
The program for the robot car is tweaked as shown below, to include the code for blinking the LEDs. There are two screen shots here; I couldn't fit the entire program into one pic... The left key event handler is shown in both pics to provide some continuity between the two screen shots. It's a large set of if-else blocks inside a forever loop. Basically, all we are doing is adding in the Blink LED code to the key-press event handlers for the Robot car...
Note: To keep the LEDs consistent with the behavior of indicator lights in real motor vehicles, the yellow LEDs for the reverse remain switched on the entire time the down arrow key is pressed, and switch off as soon as the down arrow key is released. Hence this code is slightly different from the ones providing the the blinking action for the right/left indicator red LEDs.


Here is the wiring diagram for the entire setup:


Your car should now blink the red LEDs in the above pic with left or right turns, and switch on the yellow LEDs while moving in reverse. The yellow LEDs stay on the entire time in reverse, and switch off as soon as you release the down arrow key. Here's a video of the car with the new functionalities:
Additional materials for the indicator lights:
- 4 LEDs (preferably, 2 each in the same color)
- 4 Resistors
- Jumper wires as needed
For each LED, follow the same wiring process that we used for the LEDs in the previous projects. Connect the positive leg (longer leg) of the LED to one of the Digital outputs (Digital 10, 11, 12 or 13), via a resistor. And connect the negative leg (shorter leg) of the LED to the Ground (GND) via a jumper cable. Repeat the process for all 4 LEDs.

The program for the robot car is tweaked as shown below, to include the code for blinking the LEDs. There are two screen shots here; I couldn't fit the entire program into one pic... The left key event handler is shown in both pics to provide some continuity between the two screen shots. It's a large set of if-else blocks inside a forever loop. Basically, all we are doing is adding in the Blink LED code to the key-press event handlers for the Robot car...
Note: To keep the LEDs consistent with the behavior of indicator lights in real motor vehicles, the yellow LEDs for the reverse remain switched on the entire time the down arrow key is pressed, and switch off as soon as the down arrow key is released. Hence this code is slightly different from the ones providing the the blinking action for the right/left indicator red LEDs.

Here is the wiring diagram for the entire setup:


Your car should now blink the red LEDs in the above pic with left or right turns, and switch on the yellow LEDs while moving in reverse. The yellow LEDs stay on the entire time in reverse, and switch off as soon as you release the down arrow key. Here's a video of the car with the new functionalities:
No comments:
Post a Comment